|
|
 |
Changing your e-mail address settings in Windows Live Mail
Finding your account details
Before you can begin the configuration process you must locate your e-mail address and
password. If you can remember both of these you can proceed to the next section.
Finding your e-mail details on your Yes PC
 If your computer came from Yes Computers pre-configured with an internet connection you
should be able to locate your e-mail details within the text document on your desktop.
The document is usually named "Internet Details" or "YesIT Connection Details". This is
created by the engineer when your computer is built and contains all of the details
required to access your internet connection and e-mail. If you cannot locate this file
don't worry - see the section below "Finding your e-mail password by contacting us".
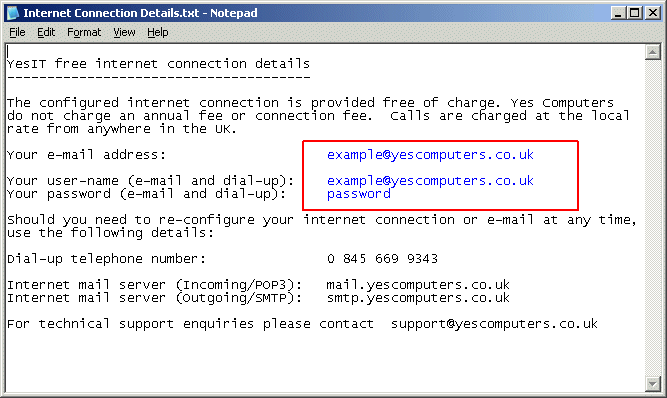
Once you have located the file, double-click on it to open it in notepad. You should see
a screen similar to the following:

The information you need to make a note of is highlighed in blue in the above picture.
Your details may be different to those listed above, make a note of them on a piece of
paper, you will need them later.
When you are sure you have the details you need, close Notepad and move on to the next
section.
Finding your e-mail password by contacting us
If you cannot find your e-mail details on your PC - either because the information has
been deleted or lost, or if the PC in question is not a Yes PC - it is possible to
retrieve your e-mail password by contacting us. In some cases we will not be able to
retrieve your password but will be able to re-set it for you.
Contact us during office hours on the following number:
+44 (1384) 370 990
You will need to know the name part (the part before the @) of your e-mail address
and should be prepared to provide at least 1 piece of security information such as your
post-code, contact number or date you purchased your PC or Internet Connection.
Once you have retrieved your password, proceed to the next section.
Editing your account in Windows Live Mail
Start Windows Live Mail and follow the
instructions below.
-
On the Left Mail pane with inbox etc right click the account name, as shown below.

-
Then you will need to left click on "Properties" as shown below.

-
Then Left Click on the tab labeled "Servers" as shown below.

-
There are 4 main things that you need to make sure are correct in this section.
A) This is the incoming mail server address should you email end in @yesit.co.uk your incoming mail server will be without quotation marks "mail.yesit.co.uk". If your email account ends in
@yescomputers.co.uk the mail server will be without quotation marks "mail.yescomputers.co.uk".
B) This is the outgoing mail server this will depend on who your internet supplier is for exmaple,
if your internet is supplied by Yes Computers your outgoing mailserver will be smtp.surfdsl.net.
C) This will be your Yes Email address if your email address is "example@yesit.co.uk" then your username will be "example@yesit.co.uk",
if your email address is "example@yescomputers.co.uk" then your username will be "example@yescomputers.co.uk"
D)This is your email account password. You would of been given this when your account was orignally setup.
Please note the boxes below that correspond to the points above.

Once all the details above are correct click ok and then click send and receive, if configured correctly then your email will start coming in.
Outgoing Mail Servers
Below is a list of the more popular internet service providers and the details for there outgoing mail servers.
| Internet Provider |
Outgoing Mail Server |
Yes Computers Broadband |
smtp.surfdsl.net |
| BT Internet |
mail.btinternet.com
mail.btclick.com |
| Tiscali |
smtp.tiscali.co.uk |
| AOL |
smtp.aol.com |
| Blueyonder |
smtp.blueyonder.co.uk |
Back to top
|
|


